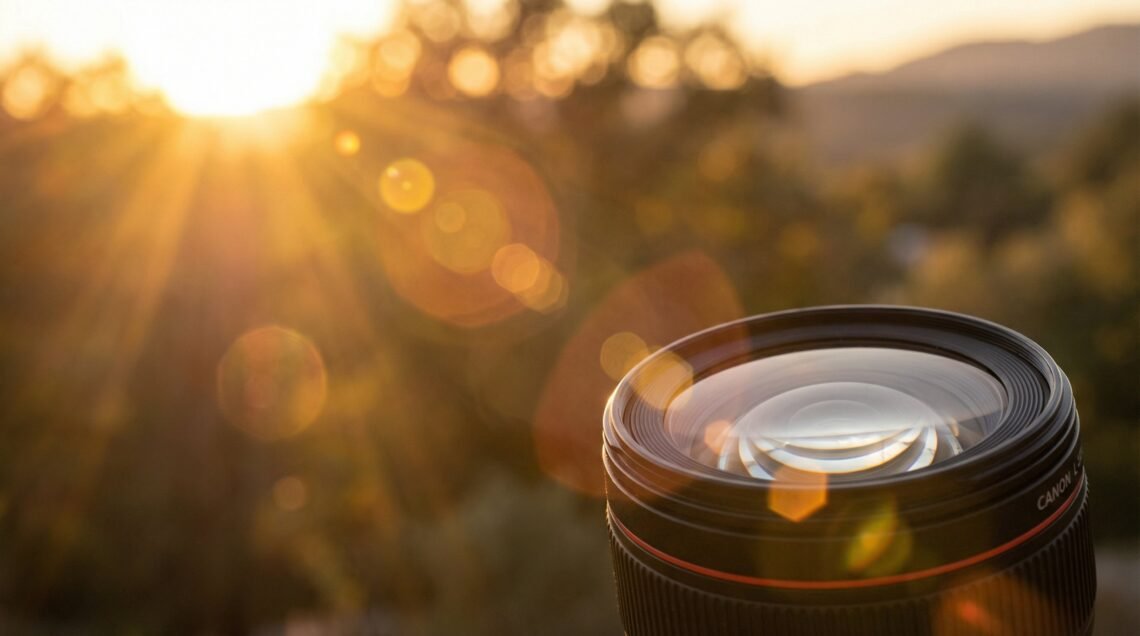
Did you know that images with strong visual cues, like a well-placed lens flare, can increase viewer engagement by over 80% on social media platforms? What was once considered a photographic flaw—a stray burst of light ruining a perfectly good shot—has been completely reimagined. Today, lens flare is a powerful creative tool, intentionally used by photographers and designers to inject emotion, drama, and a cinematic quality into their work. The photeeq lens flare effect, in particular, has empowered creators to harness this power with incredible control and realism.
This guide is your definitive resource for mastering the art and science of digital lens flare. We will move beyond simple filters and explore the optical physics that make flare so compelling. You will learn not just how to add a photeeq lens flare effect, but how to do it with an artist’s touch and a technician’s precision. From understanding the subtle differences between veiling flare and ghosting artifacts to integrating these effects into a professional workflow, this article will equip you with the knowledge to turn flat, uninspired photos into captivating, scroll-stopping visuals.
Understanding Photeeq Lens Flare
At its core, lens flare is an optical phenomenon that occurs when a bright, non-image-forming light source enters a camera’s lens system and scatters. This stray light bounces between the glass elements within the lens, creating artifacts like haze, rings, or starbursts that are not part of the actual scene. While photographers once went to great lengths to avoid it, this “flaw” is now celebrated for the unique aesthetic it can produce. The photeeq lens flare plugin is a sophisticated digital tool designed to simulate this complex behavior, giving artists complete control over the effect in a post-production environment.
The Basics Explained
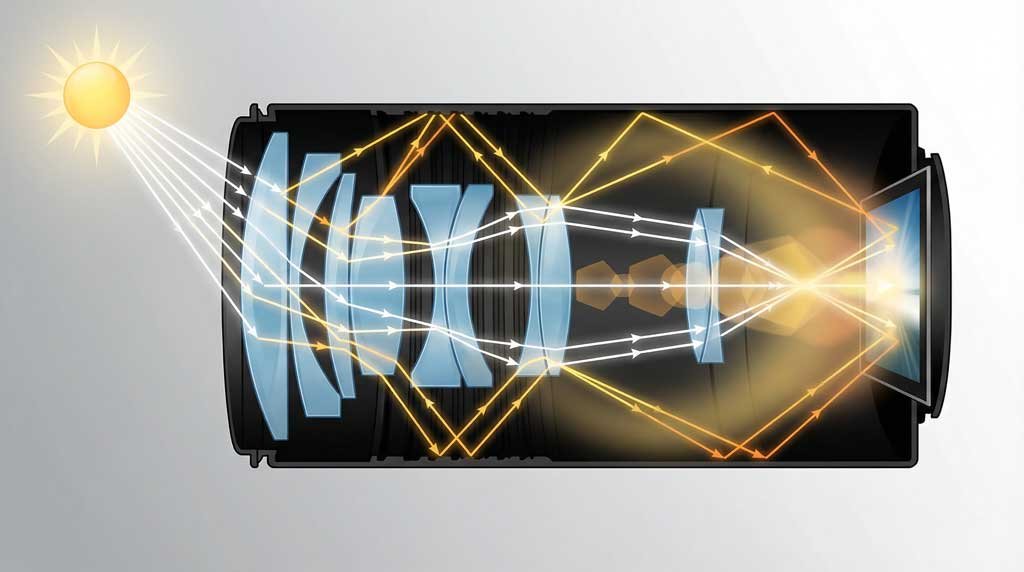
In photography, a lens is composed of multiple glass elements, each meticulously shaped and coated to focus light onto the camera’s sensor. When a powerful light source, such as the sun or a studio lamp, strikes the lens from an off-angle, not all of its rays are perfectly focused. Instead, some of this light reflects internally between the elements. This is the genesis of lens flare. Digital tools like the photeeq lens flare effect work by algorithmically recreating this process. Unlike a simple, static image overlay (like a PNG file), Photeeq generates the flare procedurally. This means it calculates the flare’s appearance based on a virtual light source and lens, resulting in a far more dynamic and realistic effect that can be manipulated in real-time.
The Science Behind the Effect
The visual character of a lens flare is dictated by the fundamental physics of light and the specific construction of the lens. As light passes through the multiple elements, a small percentage is reflected off each surface. These reflections create secondary images of the light source, which appear as the classic “ghosts” or polygonal shapes in a photo. The shape of these artifacts is often a direct reproduction of the lens’s aperture diaphragm. The photeeq lens flare simulator pays close attention to these details. It mimics how different lens coatings would absorb or reflect light and how the number of lens elements would increase the complexity of the flare. This scientific accuracy is what separates a high-quality digital flare from a cheap-looking effect; it ensures the flare behaves and looks as if it were captured in-camera.
Photeeq’s Approach to Flare
Photeeq’s methodology is built on delivering realism through procedural generation. When you add a photeeq lens flare to an image, you are not just pasting a pre-made graphic. You are activating a virtual light engine. The plugin analyzes the image to suggest optimal placement for the flare based on existing highlights, but gives the user full control to position the light source anywhere. As you move the flare’s hotspot, the plugin recalculates the entire effect—the streaks, halos, and secondary reflections—in real-time. This dynamic response is crucial for achieving a natural look. Furthermore, Photeeq operates on a non-destructive basis, meaning the effect is applied on a separate layer. This preserves the original image and allows for endless tweaking of blend modes, opacity, and masking, ensuring the flare enhances the photo without permanently altering it.
The Creative Power of Lens Flare
The deliberate use of lens flare has become a hallmark of modern visual storytelling, transforming it from a technical imperfection into an essential artistic technique. Photographers and cinematographers wield it to evoke specific emotions, guide the viewer’s attention, and add a layer of professional polish that can make an image feel more dynamic and alive. The controlled environment of a tool like the photeeq lens flare plugin gives creators the power to harness these benefits with precision.
Visual Impact and Engagement
Our eyes are naturally drawn to the brightest parts of an image. A skillfully placed lens flare acts as a powerful visual signpost, directing the viewer’s gaze exactly where the artist wants it to go. Whether highlighting a subject’s face in a portrait or drawing attention to a key product feature, the flare serves as an anchor point in the composition. This guided viewing experience is not just an artistic nicety; it has a measurable impact on engagement. On visually-driven platforms like Instagram, images that use strong directional light and atmospheric effects like flare tend to hold a user’s attention for longer, leading to higher interaction rates. The warm, ethereal glow of a flare can create an instant sense of intimacy and nostalgia, forging a stronger emotional connection with the viewer.
Cinematic Quality
Long before it became a staple in still photography, lens flare was a signature of epic cinema. Directors like J.J. Abrams have famously used anamorphic lens flare to create a futuristic and high-production-value feel. This association is now deeply ingrained in our visual culture. When we see a well-executed lens flare, we subconsciously connect it to the world of professional filmmaking. Adding a photeeq lens flare can therefore elevate a simple photograph, imbuing it with a sense of drama and narrative depth. It suggests a story beyond the still frame, making the image feel like a single moment captured from a larger, more dynamic world.
Practical Benefits
Beyond its artistic merits, lens flare offers several practical advantages in a photographer’s workflow. It can be a powerful problem-solver. A strategically placed flare can mask distracting elements in the background or add interest to a bland, empty sky. It can introduce a sense of depth and separation, preventing a composition from feeling flat by creating distinct layers of light. In portraiture, a soft, veiling flare can gently wrap around a subject, softening skin tones and creating a flattering, dreamlike glow. It is also an incredibly effective tool for establishing mood, instantly transforming a cold, sterile scene into one that feels warm, inviting, and full of atmosphere.
How Lens Flare Actually Works
To truly master a tool like photeeq lens flare, it helps to understand the real-world physics it so brilliantly emulates. Lens flare isn’t random; it is a predictable outcome of how light interacts with the complex series of glass elements inside a camera lens. This technical foundation will not only demystify the phenomenon but also empower you to create more believable and impactful digital effects.
Optical Physics Explained
A modern camera lens is not a single piece of glass. It is a carefully engineered system of multiple lens elements, each designed to bend light in a specific way to produce a sharp, focused image on the sensor. Ideally, all light from the scene would pass directly through these elements without deviation. However, no lens is perfect. When a very bright, off-axis light source hits the front element, a small fraction of that light doesn’t pass through cleanly. Instead, it reflects off the surfaces of the internal elements. These internal reflections are the root cause of lens flare. The light bounces between the glass surfaces, scattering in unintended directions. Some of this scattered light eventually reaches the sensor, but it is no longer focused, appearing as haze, streaks, or distinct shapes.
The shape and appearance of these artifacts are directly influenced by the physical characteristics of the lens. For instance, the polygonal shapes often seen in ghosting flare are a direct imprint of the lens’s aperture diaphragm—the adjustable opening that controls how much light enters. A 7-bladed aperture will produce 7-sided flare artifacts, while a 9-bladed aperture will create 9-sided shapes. High-end lenses use special anti-reflective coatings on their elements to minimize these internal reflections, but even the best lenses will produce some degree of flare when pointed at a sufficiently bright light source.
Types of Lens Flare (Detailed)
Lens flare manifests in several distinct forms, each with its own cause and visual signature. Understanding these types is key to both controlling them in-camera and recreating them authentically with photeeq lens flare.
Veiling Flare: This appears as a milky haze or a significant loss of contrast across a large portion of the image, as if a semi-transparent veil has been draped over the scene. It is caused by widespread, non-directional scattering of light within the lens housing. While often considered undesirable because it washes out blacks and reduces color saturation, a subtle veiling flare can be used creatively to produce a soft, dreamy, or vintage aesthetic.
Ghosting Flare: This is the most recognizable type of flare, consisting of a series of distinct shapes—often circles, hexagons, or other polygons—that appear in a line leading away from the light source. These “ghosts” are essentially secondary images of the light source or the aperture diaphragm, formed by strong internal reflections between two or more lens elements. The number of ghosts often corresponds to the number of elements in the lens. This is the type of flare most often replicated for dramatic, cinematic effects.
Sensor/Red Dot Flare: A more recent phenomenon associated with digital cameras, particularly mirrorless models. This occurs when light reflects off the surface of the image sensor itself, bounces back up to the lens elements, and then reflects again back down to the sensor. This double reflection can create small, colored dots (often red or magenta) in the image. The short distance between the lens mount and the sensor (flange distance) in mirrorless cameras makes them more susceptible to this type of flare.
Factors Influencing Flare Occurrence
The intensity and character of lens flare are not constant; they are influenced by a combination of equipment choices and shooting conditions.
Focal Length: Wide-angle lenses, by their nature, take in a much broader field of view, making it more likely that a bright light source like the sun will be included in the frame, causing flare. Zoom lenses, with their large number of internal elements, are also highly prone to complex ghosting flare.
Lens Quality and Coatings: High-quality prime lenses with fewer elements and advanced multi-layer anti-reflective coatings are generally more resistant to flare than cheaper zoom lenses. These coatings are engineered to absorb stray light rather than letting it reflect.
Aperture Setting: The aperture value (f-stop) has a dramatic effect on flare. A wide-open aperture (e.g., f/1.8) will produce larger, softer, more diffuse flare artifacts. A narrow aperture (e.g., f/16) will create smaller, sharper, and more defined artifacts, often resulting in a distinct “starburst” effect around the light source.
Light Source Angle and Intensity: The position and brightness of the light source are the most critical factors. A light source just outside the frame can cause significant veiling flare, while a direct shot into the sun will produce strong ghosting.
Filters: Placing a low-quality or dirty filter (like a UV or polarizing filter) in front of the lens adds two more reflective surfaces, significantly increasing the likelihood and intensity of lens flare.
What Photeeq Lens Flare Offers
Understanding the theory of lens flare is one thing; having a powerful and intuitive tool to control it is another. The photeeq lens flare plugin is designed to bridge that gap, offering a comprehensive suite of features that cater to both beginners seeking a quick, stylish effect and professionals demanding granular control over every aspect of the light.
Core Features
Photeeq’s power lies in its combination of simplicity and depth. The plugin is built around a few core principles that make it an effective and user-friendly tool. It comes with a preset library for those who need great results fast. These presets are categorized by style (e.g., “Cinematic,” “Vintage,” “Sunburst”) and serve as excellent starting points. Every preset is fully editable, allowing users to dive into a detailed control panel to tweak every parameter of the flare, from the brightness of the core to the color of the secondary reflections.
Crucially, Photeeq works non-destructively through a layer-based workflow. The flare is generated on its own layer, allowing you to use Photoshop’s powerful blend modes, opacity adjustments, and layer masks to seamlessly integrate the effect with your base image. There is no guesswork involved thanks to the real-time preview. As you adjust parameters, a high-quality preview window shows you exactly how the flare will look, allowing for rapid iteration and fine-tuning.
Available Flare Types
The plugin provides a versatile palette of flare styles, each designed to replicate a specific type of real-world optical artifact. Sunburst effects mimic the bright, star-shaped glints created by a narrow aperture pointed at the sun. Cinematic flares are wide, streaky, and often tinted, perfect for replicating the anamorphic flare look popular in movies. Anamorphic streaks create long, horizontal flares that add a dramatic, sci-fi, or action-movie aesthetic. Bokeh flares simulate the soft, out-of-focus orbs of light that are characteristic of a wide aperture. Ghosting effects create the series of polygonal or circular artifacts that result from internal lens reflections. These styles can be layered and combined, allowing for the creation of unique and complex custom flare composites.
Control Parameters
This is where the true power of photeeq lens flare becomes apparent. The level of control is extensive. You can drag and drop the flare’s hotspot anywhere on the canvas with precise position control. Size and scale parameters allow you to independently control the size of the main light source and the scale of the secondary artifacts. Intensity and opacity controls let you dial in the precise brightness of the flare and its overall transparency. Color temperature adjustment allows you to shift the hue of the flare along a warm-to-cool spectrum to match the lighting in your photo. You can also change the rotation and angle of streaks and artifacts to align with your light source, and utilize various blend mode options for optimal results.
Compatibility and Integration
Despite being a legacy tool, the photeeq lens flare plugin maintains a surprising degree of compatibility. It integrates directly into Adobe Photoshop as a filter plugin, typically found under Filter > Photeeq > Lens Flare. For Adobe Lightroom users, there is no direct integration. The common workflow is to edit an image in Lightroom, use the “Edit In” command to open it in Photoshop to add the flare, and then save it back to the Lightroom catalog. For those without a Photoshop subscription, the free, browser-based editor Photopea supports Photoshop plugins, and Photeeq can often be loaded into its workspace.
The plugin is lightweight and runs on most modern Windows and macOS systems that can run Photoshop CS5 or newer. A minimum of 4GB of RAM is recommended, with 8GB or more being ideal for smooth performance.
Adding Lens Flare: A Practical Walkthrough
Theory and features are important, but the real test of any tool is its practical application. This section provides a clear, step-by-step guide to adding a photeeq lens flare effect to your images using the most common editing software. Following a structured process ensures consistent, high-quality results.
Preparation Phase
Before you even open the plugin, a few preparatory steps can make a significant difference. First, choose the right image. The most believable flares complement an existing light source. Select photos that already have the sun, a bright lamp, or strong reflections in the shot. The effect will feel more natural if it has a logical origin. Second, organize your layers. Always work non-destructively. Before you begin, create a duplicate of your background layer (Ctrl+J or Cmd+J in Photoshop). This preserves your original image. Finally, consider your goal. Are you aiming for subtle realism or dramatic, cinematic flair? Knowing your objective will guide your choices in the steps ahead.
For Photoshop Users
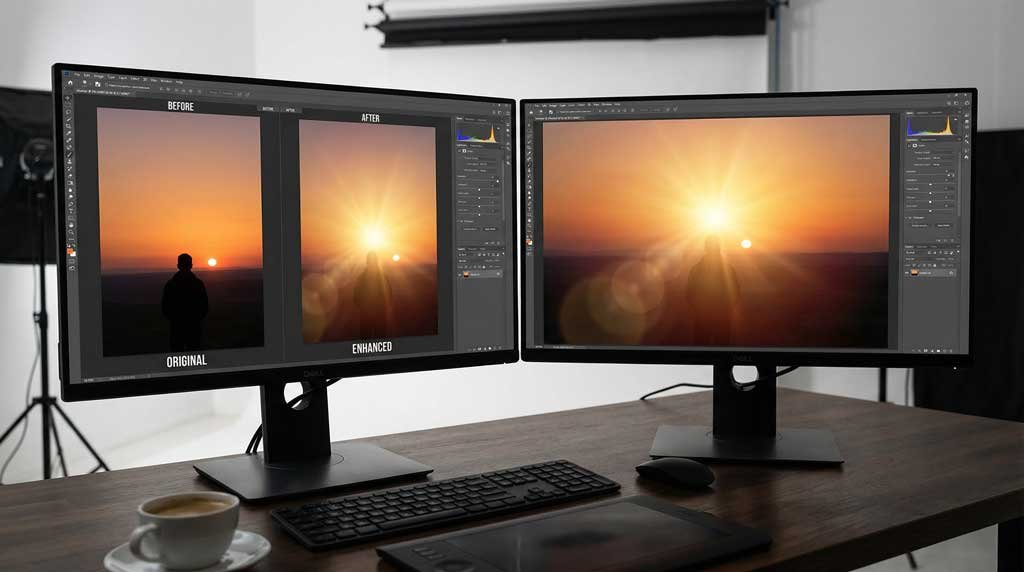
This is the most direct and powerful workflow for the photeeq lens flare plugin. Begin by opening your image in Photoshop and duplicating the background layer. Navigate to the top menu and select Filter > Photeeq > Lens Flare. This will open the main plugin interface with a preview of your image. Browse the preset library and choose a flare that matches the mood of your photo. Don’t worry about getting it perfect; this is just a starting point.
In the preview window, you will see a hotspot or crosshair representing the light source. Click and drag this hotspot to align it with the brightest point of the light source in your image (e.g., the center of the sun). Use the sliders in the control panel to adjust the Intensity, Scale, and Brightness. Lower the intensity for a more subtle look or increase it for high drama. Adjust the scale to control how far the flare artifacts spread across the image. Use the Color or Temperature slider to shift the hue of the flare. A warm, golden flare is perfect for sunset shots, while a cooler, blue-tinted flare might suit a nighttime or futuristic scene.
Once you are satisfied with the preview, click “OK” to apply the flare to your duplicated layer. With the flare on its own layer, change the layer’s blend mode. Screen is the most common choice as it adds the light without darkening the image, creating a very natural blend. Linear Dodge (Add) creates a stronger, brighter effect. Lower the layer Opacity to reduce the overall strength of the flare until it sits perfectly in the image. Finally, add a layer mask to the flare layer. Using a soft, black brush at a low opacity, paint over any areas where you want to reduce or remove the flare, such as a subject’s face or important foreground details.
For Lightroom Users
Since Lightroom does not support this type of plugin directly, the workflow involves a round trip to Photoshop or a similar editor. Start by performing your basic adjustments (exposure, color, etc.) in Lightroom. Right-click the image and choose Edit In > Adobe Photoshop. Lightroom will generate a new file (typically a TIFF) and open it in Photoshop. Once in Photoshop, follow the 9-step process described above to add and refine your photeeq lens flare. After applying the flare, simply save the file in Photoshop (Ctrl+S or Cmd+S). The updated image with the flare will automatically appear back in your Lightroom catalog, stacked with the original.
For Photopea Users
Photopea, the free online editor, offers a fantastic alternative for those without a Photoshop subscription. The process for loading a plugin into Photopea can vary, but it typically involves accessing the plugin through a script or panel if it has been integrated by the Photopea community. Once the plugin is active, the workflow is nearly identical to the Photoshop process. You will open your image, create a new layer, launch the Photeeq interface, position the flare, and adjust its parameters. After applying the effect, you can export your finished image in various formats like JPG or PNG directly from your browser.
Advanced Tips for Natural Results
Adding a lens flare is easy. Adding a believable lens flare—one that enhances rather than distracts—requires a more nuanced approach. Professionals use a combination of technical knowledge and artistic sensibility to seamlessly integrate digital flares. These advanced techniques will help you move beyond basic application and master the subtle art of light manipulation with photeeq lens flare.
Alignment and Positioning
The single most important factor for a realistic flare is its placement. A randomly placed flare immediately looks fake. Always align the flare’s hotspot with the most dominant light source in your photograph. If the sun is in the top-right corner, your flare must originate from there. Respect the shadows. The angle of your flare’s streaks and artifacts should logically follow the direction of the shadows in your image. If shadows are falling to the left, your flare should streak from the right. Consider obstructions. If the light source is partially blocked by an object (like a tree or a building), the flare should appear partially occluded as well. Use layer masks to paint out parts of the flare that would realistically be hidden.
Color and Temperature Matching
Color is a powerful tool for realism. A flare’s hue should feel like a natural extension of the scene’s existing light. Match the time of day. A sunset photo is dominated by warm oranges, yellows, and reds. Your flare should be tinted accordingly. A midday shot under a clear blue sky calls for a more neutral or slightly cool-toned flare. For perfect matching, you can use the eyedropper tool to sample a color directly from the brightest part of your light source and use that hue to tint your flare layer in Photoshop. In commercial photography, you can subtly tint a flare to align with a brand’s color palette, but do so with extreme care to avoid an unnatural look.
Opacity and Subtlety
The most common mistake beginners make is creating flares that are too intense. In professional work, subtlety is key. A good starting point for your flare layer’s opacity is between 20% and 40%. A flare should feel like a gentle kiss of light, not a blinding explosion. Master blend modes. While Screen is the go-to blend mode, experiment with others. Soft Light can create a very subtle, hazy glow, while Linear Dodge (Add) produces a much stronger, more cinematic effect. For added depth, you can stack multiple flare layers. Use a large, soft, low-opacity flare to create a base haze, and then add a smaller, more defined flare on top to create a distinct starburst or ghosting effect.
Masking and Protection
A lens flare should enhance your subject, not overwhelm it. Layer masks are essential for protecting the most important parts of your image. Always mask the flare off of your subject’s face, especially the eyes. You want the light to wrap around them, not cover them. In commercial shots, ensure that logos, product labels, and any important text remain perfectly clear and readable. When masking, use a large, soft-edged brush with a low flow (10-20%). This allows you to build up the masking effect gradually, creating a smooth and natural falloff rather than a hard, artificial edge.
Where Lens Flare Makes the Biggest Impact
The true value of a tool like photeeq lens flare is revealed in its application. Across various genres of photography and design, the intentional use of lens flare can solve problems, enhance moods, and deliver a competitive edge. Here’s a look at how professionals are using digital lens flare in their day-to-day work.
Portrait Photography
In portraiture, light is everything. Lens flare can be used to create a soft, romantic, and often ethereal quality that is highly sought after, particularly in wedding and lifestyle photography. By placing a warm, veiling flare behind a subject, a photographer can simulate the dreamy look of a backlit, golden-hour shoot, even if the original lighting was flat. It can help to separate the subject from the background and wrap them in a flattering glow, minimizing harsh shadows and creating a more intimate feel. The key is to use it subtly, ensuring the flare enhances the subject rather than overpowering them.
Product Photography
For e-commerce and advertising, making a product look desirable is paramount. While clarity is crucial, a sterile, perfectly lit product can sometimes feel boring. A controlled photeeq lens flare can add a touch of luxury and production value. For products with reflective surfaces, like watches, perfume bottles, or smartphones, a sharp, streaky flare can be used to create a high-end “glint” that emphasizes the quality of the materials. It can make a product feel more dynamic and aspirational, helping it to stand out in a crowded online marketplace.
Landscape Photography
Landscape photographers have a long history of managing—and embracing—the sun. Digital lens flare gives them the ability to perfect what nature provides. It can be used to enhance the drama of a sunrise or sunset, adding a radiant starburst effect that might have been difficult to capture in-camera. For scenes with a less dramatic sky, a soft, wide flare can add a sense of warmth, atmosphere, and depth, transforming a simple vista into a breathtaking, cinematic landscape. It allows the artist to guide the viewer’s eye through the scene and emphasize the majestic quality of the light.
Social Media Content
In the fast-paced world of social media, grabbing attention is the name of the game. A well-executed lens flare can be the visual element that makes a user stop scrolling. The bright contrast and directional light act as a thumb-stopper. Influencers and brands use it to create a consistent, high-end aesthetic for their feeds, making their content look more professional and curated. For thumbnail images on platforms like YouTube, a bright focal point created by a flare can significantly increase click-through rates by making the thumbnail more visually compelling than its competitors.
Video Production
In motion graphics and video editing, lens flare is a fundamental tool. It is used to add energy to transitions, create dramatic reveals, and integrate CGI elements more seamlessly into live-action footage. Tools like photeeq lens flare, while primarily for stills, are based on the same principles as their video counterparts (like Video Copilot’s Optical Flares). Understanding how to control flare in a still image provides a foundational skill set for any artist looking to move into video, where light is used to tell stories, convey emotion, and create a polished, professional final product.
How Photeeq Compares
While photeeq lens flare is a powerful and accessible tool, it’s not the only option available for creating digital light effects. The right choice depends on your specific needs, budget, and workflow. Here’s how Photeeq stacks up against some of the most popular alternatives.
Photeeq Lens Flare
Its biggest advantages are its focus on realism and its intuitive, user-friendly interface. The procedural generation engine creates believable optical effects that are a significant step up from simple overlays. Because it operates as a non-destructive layer, it offers excellent flexibility within a standard Photoshop workflow. The primary drawback is that Photeeq is legacy software. It is no longer actively developed or supported, which means there will be no new features or official compatibility updates for future versions of editing software. It is best for photographers and designers who want to add high-quality, realistic lens flare to still images quickly and without a steep learning curve.
Optical Flares by Video Copilot
Developed by Andrew Kramer, Optical Flares is the industry standard for lens flare in the motion graphics and visual effects world. It offers an unparalleled level of customization, a massive library of presets, and a sophisticated interface for designing complex flare systems from scratch. It is primarily designed for video and integrates seamlessly with Adobe After Effects. This power comes with a much steeper learning curve and a higher price point. For still photographers, its feature set can be overkill. It is best for video editors, motion graphics artists, and VFX professionals who need maximum control and are working primarily in a video-based environment.
Photoshop’s Built-in Lens Flare
It’s free and already built into Photoshop (Filter > Render > Lens Flare). For a quick, basic effect, it’s the most accessible option available. However, the built-in filter is notoriously limited and has changed very little over the years. It is a destructive filter (it permanently alters the layer it’s applied to), offers minimal customization, and its results often look dated and unrealistic compared to more specialized tools. It is best for beginners who want to experiment with the basic concept of lens flare or users who need a very quick and simple effect without any need for realism or control.
Comparison Table
| Feature | Photeeq Lens Flare | Optical Flares | Photoshop (Built-in) | Photopea (with Photeeq) |
|---|---|---|---|---|
| Ease of Use | High | Medium | Medium | High |
| Realism | High | Very High | Low | High |
| Customization | High | Very High | Very Low | High |
| Video Support | No | Yes | No | No |
| Cost | One-time (if found) | Subscription/One-time | Included | Free |
| Workflow | Non-destructive | Non-destructive | Destructive | Non-destructive |
| Best For | Still Photographers | Video Professionals | Quick & Basic Effects | Free Alternative |
Solving Common Photeeq Problems
Even with an intuitive tool like photeeq lens flare, you might occasionally run into issues, especially since it is legacy software. Here’s a quick guide to troubleshooting some of the most common problems.
Installation Issues
If the plugin doesn’t show up in Photoshop’s Filter menu, the most likely cause is that it was installed in the wrong directory. Ensure the plugin file is located in the correct Plug-ins folder for your version of Photoshop. You may need to restart Photoshop for it to appear. If you get an error message on launch, you may be running a version of Photoshop that is too new for your version of the plugin. Sometimes, running Photoshop in a compatibility mode (like Rosetta on Apple Silicon Macs) can resolve these issues.
Quality Issues
If your flare looks fake, the cause is almost always over-application. Reduce the layer opacity to the 20-40% range and ensure the blend mode is set to Screen or Soft Light. Also, double-check that the flare’s color temperature matches the scene. A flare that looks “pasted on” can be softened by using a layer mask. Use a very soft, low-flow black brush to gently paint away the hard edges of the flare, blending it more naturally into the background.
Performance Issues
The real-time preview requires a decent amount of processing power. If it’s running slowly, try working on a smaller version of your image to set up the flare, and then apply the final settings to the high-resolution version. Closing other resource-heavy applications can also help. When working with very large images (50+ megapixels), it’s a good practice to apply the flare on a separate, empty layer rather than a duplicated image layer. This can reduce memory usage.
Your Photeeq Lens Flare Questions Answered
Here are answers to some of the most frequently asked questions about the photeeq lens flare plugin, covering everything from availability to advanced usage.
- 1. Is Photeeq Lens Flare still supported and available?
- Photeeq Lens Flare is considered legacy software, meaning it is no longer actively developed or officially supported. However, it remains a popular tool, and legacy installers can still be found on various photography forums and software archive websites. For a more modern and supported alternative, consider exploring plugins like Optical Flares or the built-in tools in editors like Luminar Neo.
- 2. What are the system requirements for Photeeq?
- The plugin is lightweight and generally works on any system that can run Adobe Photoshop CS5 or newer. This includes most modern Windows and macOS computers. A minimum of 4GB of RAM is recommended, but for a smooth experience, especially with high-resolution images, 8GB of RAM or more is ideal.
- 3. Can I use Photeeq Lens Flare with Lightroom?
- There is no direct way to use Photeeq as a plugin within Lightroom. The standard professional workflow is to perform your primary edits in Lightroom, then use the “Edit In > Adobe Photoshop” command. This opens the image in Photoshop, where you can add the flare on a separate layer. When you save the file in Photoshop, the updated version with the flare will appear back in your Lightroom library.
- 4. How realistic does Photeeq Lens Flare look?
- When used correctly, Photeeq can produce highly realistic results. Its procedural generation engine is designed to mimic real-world optical physics, which makes it far superior to simple overlays. The key to realism is subtlety. Use a low opacity, match the flare color to your scene’s lighting, and carefully position the flare to align with an existing light source.
- 5. Will adding lens flare reduce my image quality?
- No, not if you use a non-destructive workflow. By applying the photeeq lens flare on a separate layer in Photoshop, you are not altering the pixels of your original image. This allows you to modify, mask, or even delete the flare at any time without any loss of quality to the underlying photo.
- 6. What’s the best way to learn Photeeq?
- The best way to learn is by doing. Start by experimenting with the included presets to understand the different styles of flare. Then, begin adjusting the sliders one by one to see how they affect the result. Focus on mastering the Intensity, Scale, and Color Temperature controls first, as these have the biggest impact on the final look.
- 7. Can I use Photeeq Lens Flare for commercial work?
- This depends on the license agreement that came with the version of the plugin you are using. Since it is legacy software, licensing can be ambiguous. If you are doing professional client work, it is always safer to use software with a clear and current commercial use license. For personal projects, it is generally not an issue.
- 8. How does Photeeq compare to Optical Flares?
- Photeeq is a simpler, more intuitive tool designed primarily for still photographers. Optical Flares is a much more complex and powerful plugin designed for video professionals and VFX artists. While Optical Flares offers more control and features, it has a steeper learning curve and a higher cost. For most photography needs, Photeeq provides an excellent balance of realism and ease of use.
Transform Your Photography with Photeeq Lens Flare
Light is the language of photography, and lens flare is one of its most expressive dialects. What was once a technical flaw has become a powerful artistic statement, capable of infusing an image with warmth, drama, and a professional, cinematic quality. Throughout this guide, we have journeyed from the fundamental physics of light scattering to the practical, step-by-step techniques for implementing the photeeq lens flare effect in a modern digital workflow. You are now equipped not just with the “how,” but with the “why”—the creative and strategic reasoning that separates amateur effects from professional artistry.
The true power of a tool like Photeeq lies in its ability to give you control over this incredible force of light. By understanding how to balance subtlety with impact, how to match color and temperature, and how to seamlessly integrate a digital flare into your photographs, you can elevate your work to a new level. The techniques and insights shared here are your foundation. Now, it’s time to experiment. Push the boundaries, find your unique style, and start telling more compelling stories through the beautiful, dynamic, and expressive power of light.
Ready to start your journey? If you can source the legacy plugin, we encourage you to install it and begin experimenting. Alternatively, explore some of the modern alternatives mentioned in this guide. The most important step is the next one you take. Go create something amazing.